Although, Microsoft has included loads of distinct features in Windows 10 Technical Preview and keep developing, yet, it doesn’t contain any feature that can turn it into a Wireless WiFi hotspot. Almost all of smartphone users use internet on their mobile. If you have a good data connection on your PC, why not try to use that same internet connection on mobile as well.
You can obviously use your PC’s internet connection on your mobile using dedicated WiFi router, hotspot software such as Connectify, Virtual Router Plus,mHotSpot and more others similar tools. Almost all of those diligent software work great. But, what if you can turn Windows 10 PC into a WiFi hotspot without installing any third party software or using any WiFi router?
YES! This is possible but you must have WiFi components included in your desktop or laptop computer. Otherwise, you cannot perform what is required to create a Wireless WiFi hotspot. Now, you know that Windows 10 is about to launch later this year. But, as of now, Microsoft has not included any such feature in the Technical preview version of Windows 10. Anyway, let’s get started.
System Requirements: Windows 10 (Though, you can perform the same thing on other versions of Windows e.g. Windows 7, Windows 8 and Windows 8.1.). The second required thing is in-built or external WiFi card that generally comes with today’s laptops. But, if you do not have any WiFi card included in your personal computer, you cannot execute this trick.
How to turn Windows 10 PC into a WiFi hotspot?
This is very easy with the help of Command Prompt. You just need to enter two commands to turn this ON. Although, Windows has this option but you have to do something more to use this in a different way. You need to create a sharable and virtual Wireless connection to get things done. To do so, just follow the subsequent steps,
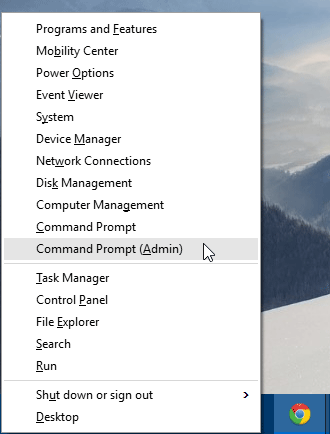
At first open Command Prompt with Administrator privilege. To do so, press Win + X and select Command Prompt (Admin).
Now, you will have to click on YES on the confirmation window. After that, enter the following command in your command prompt,
netsh wlan set hostednetwork mode=allow ssid=YourSSIDName key=YourKey
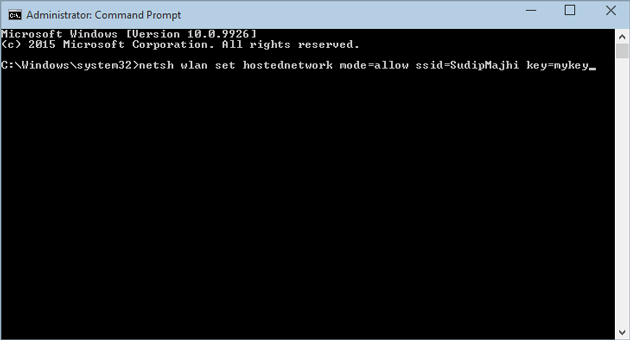
Can change YourSSIDName and YourKey if you want. YourKey is the password. After setting up everything, just hit enter. It will create a new Wireless connection. Then, enter the following command to start this wireless WiFi connection,
netsh wlan start hostednetwork
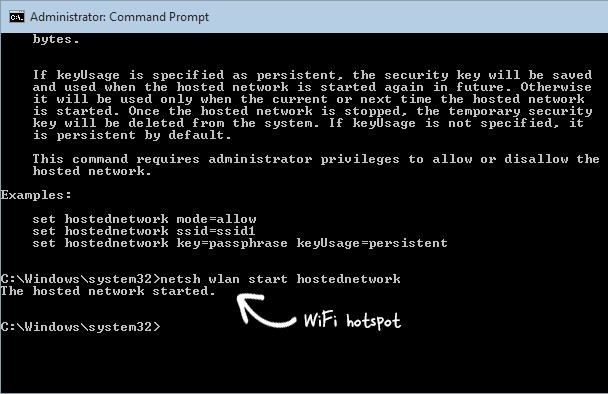
Now, your Wireless connection is ready to use. Generally, WiFi enabled laptops make this connection sharable, by default. However, if you are getting it on your mobile or any other PC as a WiFi hotspot, you can turn ON sharing from Network and Sharing Center.
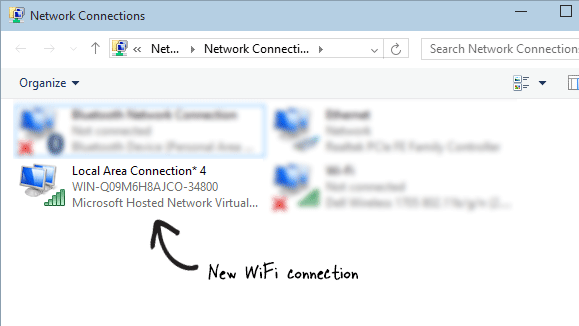
Now, you can easily use your PC’s internet connection on any WiFi enabled mobile or PC. If you want to stop this Wireless WiFi hotspot, just open your Command Prompt with administrator privilege and enter the following command,
netsh wlan stop hostednetwork
That’s it!
Instead of using any premium third party software or dedicated WiFi router, you can make use of this little trick to turn Windows 10 PC into a WiFi hotspot. This is good not a regular use.