zANTI is a penetration testing toolkit developed by Zimperium Mobile Security for cyber security professionals. Basically, it allows you to simulate malicious attacks on a network. With the help of zANTI, you will be able to perform various types of operations such as MITM attacks, MAC address spoofing, scanning, password auditing, vulnerability checks and much more. In short, this android toolkit is a perfect companion of hackers.


You might also like: aNmap – Android App For Hackers

Today I’m going to give you a step by step guide on how to use zANTI.

Before jumping into the how-to guide, take a look at some of the things you can do with zANTI:

  • Change device’s MAC address.
  • Create a malicious WiFi hotspot.
  • Hijack HTTP sessions.
  • Capture downloads.
  • Modify HTTP requests and responses.
  • Exploit routers.
  • Audit passwords.
  • Check a device for shellshock and SSL poodle vulnerability.
Excited?
Let’s start!

Note: Before installing the app, make sure your device is rooted properly and you have installed SuperSU on the device.

You might also like: FaceNiff Tool – Android App For Hackers

How To Use zANTI:

 
1. Download zANTI 2.2(Official Link | MediaFire Link)
2. Install it on your device, open the application, then grant the root access. You will see a window like this:
zANTI Community
3. Enter your email address and then check the “I accept Zimperium’s EULA” box. Then tap on “Start Now”. A pop-up window will appear:
Zimperium Network
4. If you want to join zNetwork, tap on “Enable”, otherwise tap on “Skip”. Wait for some seconds, it will display a screen as shown below:
zNetwork mapping
5. Tap on “Skip” and then enable zANTI (simply check the “I am fully authorized to perform penetration testings on the network” box):
zanti enabled

6. Tap on “Finish”. You will see a screen as shown below:

Device's list
Now, let’s talk about the program modules……

Mac Changer

 
Mac changer allows you to change your WiFi Media Access Control (MAC) Address.

How To Use Mac Changer:

 
1. Use the navigation key (or swipe from the left). You will see a screen as shown below.
zanti network tasks
2. Tap on “MAC Changer”:
Change Mac Address
3. Tap on “Set new MAC Address”. Wait for few seconds, you will get a new MAC address!
If you want to use a custom MAC address, turn off “Generate Random” and then type the MAC address you want. Then tap on “Set new Mac Address”.
Moving onto the next one…..

zTether

 
It allows you to create a WiFi hotspot and control your network traffic.

How To Use zTether:

 
Note: Before using zTether, you must turn off the WiFi on your device.
1.  Tap on “zTether”. You will see a screen as shown below.
zANTI Tether Control
2. Turn on “Tether Control” and then allow users to connect to your network. Once you got at least one user on your network, you can start playing with the traffic!
3. If you got a user on your network, tap on the first (Logged Requests) “View” to see all the HTTP requests made by the user(s) on your network. It may contain passwords and other sensitive information (See the image below).
Logged http requests
You can tap on any logged activity to get more details (sessions, passwords, requests and user agents):
logged activities
If you want to hijack an HTTP session, just tap on a session. It will open up the victim’s session on your device.
Use the second “View” (Logged Images) to see all the images that are transmitted on your network. This includes all images requested by the users (see the image below).

Images requested by users

Moving onto the next program module….

zPacketEditor


It allows you to modify HTTP requests and responses on your network. It is basically an interactive mode that can allow you to edit and send each request and response.

How To Use zPacketEditor:

First, tap on “zPacketEditor” and then turn on the module. You will see the live requests and responses there (1). If you want to edit a particular request or response, swipe it to the right (2). After the edit, you can tap on “Send” button (3).

how to use zPacketEditor

You might also like: DroidSheep – Android App Download

Moving onto the next functionality….

SSL Strip


SSL Strip is a type of Man In the Middle Attack that forces victim’s browser into using HTTP instead of HTTPS (SSL Strip is turned on by default).

Note: Websites using HSTS (HTTP Strict Transport Security) are immune to SSL Strip attacks.

Moving onto the next one……

Redirect HTTP


It allows you to redirect all HTTP traffic to a site or server. For example, If you turn on the “Redirect HTTP”, it will redirect all HTTP traffic to Zimperium servers (default configuration). But if you want to forward all the traffic to a particular site, tap on the settings icon, you will see an area to enter a URL (see the image below). Enter a URL in the field and then again tap on the settings icon.

redirect all http requests

Now moving onto my favorite MITM module….

Replace Images

 
It enables you to replace website images (victim’s web browser) with your own image. In order to replace images, first, tap on the settings icon and then tap on “Select Image”:
Replace Images zANTI
After selecting an image from your device, tap on the settings icon (see the image below):

Image replaced

Now, the users will see the selected image everywhere on the web!

Moving onto the next one…..

Capture Download


It allows you to intercept and download all specified files to the SD card. For example, if you want to capture pdf files, you have to tap on the settings icon and then select the .pdf from the menu. Then turn on “Capture Download”.

download capturing using zANTI

Intercept Download

 
Intercept Download allows you to replace a downloaded file with a specified file. In order to intercept and replace victim’s downloaded files, you have to tap on the settings icon. Then tap on “Select File” to select a file:
Replace Downloaded File
After selecting the file, tap on the settings button again and then turn on “Intrecept Download”.

Insert HTML

 
Insert specified HTML into webpages
 
It enables you to insert specified HTML codes into web pages. If you want to display an alert box saying “zANTI Test”, just turn on the “Insert HTML” module. But if you want to insert your own codes into the web pages, you have to tap on the settings icon and then enter your HTML codes. Then tap on settings icon again.

Routerpwn.com

 
Router pwn is a web application for exploiting router vulnerabilities. It is a compilation of ready to run local and remote exploits.

How To Use Routerpwn.com:


First, tap on “Routerpwn.com”, it will open up the www.routerpwn.com (see the image below).
routerpwn
Then select your router vendor from the list. You will see many ready to run local and remote exploits there.
Use them!

WiFi Monitor

It allows you to monitor WiFi strength, name and MAC address. In short, nothing special!

HTTP Server

 
It enables you to run an HTTP server on your android device. All you have to do is tap on “HTTP server” and then turn on that program module:
Log Entries in HTTP server
Note: You can also create directories and store files on the server.
Now it’s time to go back to the main window:
main
At the top of the screen, you can see 4 functions. The first one shows the devices found on the target network (history). The second one is used to map/remap the network. Third one is a search function that can be used to search a particular device. Last one is an “Add Host” function that is used to add a particular host to the current network.

How To Scan a Target Device?

 
First, select a device on your network (just tap on it). You will see a screen as shown below:

Then tap on “Scan”. You will see the below screen:
Scanning the device
You can change the “Scan Type” if you want. You can also run a script while scanning the target, all you have to do is select the required script from the “Execute Script” menu. It also includes a function called “Smart Scanning”, for identifying vulnerabilities of the target device.
After setting the scan options, tap on “Go” to start scanning the device.  When the scan completes, zANTI will show a notification as shown below:
Scan completed
You can get the scan report by tapping on “Nmap Scans” (see the image below):
Nmap scan results
Moving onto the next question…..


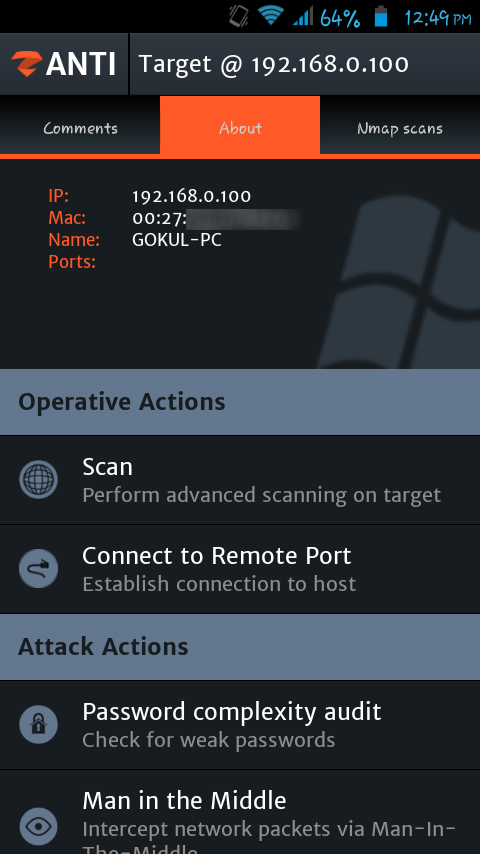
How to Establish Connection to a Device?

 
Follow the below procedures:
Note: Your device should have ConnectBot app installed. (Official Link | MediaFire Link)
1. Select the target device, then tap on “Connect to Remote Port”. You will see a screen as shown below:
Connect to remote port
2.  Tap on any port, ConnectBot will connect your device to the host.

Password Complexity Audit

 
It is a program module that you can use to analyze the password strength. That means it can help you to strengthen your system security.
Here is how to do password complexity audit using zANTI:
 
1. Select the device you want to audit. Then tap on “Password complex audit”. You will see a screen as shown below:
auditing password using zANTI

Note: You cannot change the cracking method on the free version of zANTI.

Turn off the “Automatic Mode” to audit a particular protocol. In the Automatic Mode, you should tap on the “Go” button to start the audit.

How To Perform MITM Attack?


Performing Man In The Middle attack with the help of zANTI is easier than anything. Follow the below procedures to perform MITM attack:


1. Select the target and then tap on “Man in the Middle”. You will see a similar window as in “zTether” (Except the “MITM method”):


MITM Attack Using zANTI


I don’t think, I should explain the same program modules again, so I’m going to talk about the “MITM method”.


MITM Method

 
The program module named “MITM method” is used to select your favorite MITM technique. Two methods are available: ARP (Address Resolution Protocol) and ICMP (Internet Control Message Protocol).
You may ask “what is the difference between these two methods?” Here is the answer:
ARP MITM attack works by spoofing MAC address within the LAN. That is, the attacker’s machine acts as the target device and router at the same time.
  • From the view of the Router – Attackers machine is the user’s machine.
  • From the view of victim’s computer – Attackers machine is the router.
ICMP MITM attack works by spoofing an ICMP redirect message to the router. The spoofed message re-routes the victim’s traffic through an attacker-controlled router.

How To Check a Target For “ShellShock” Vulnerability?


First, select the target device. Then tap on “ShellShock”. It will start scanning the target (see the image below):

Shellshock Vulnerability zANTI

Wait for some time. After scanning the target device, it will display the result.

How To Check a Target For “SSL Poodle” Vulnerability?

 
First select the target device, tap on “SSL Poodle”, it will scan the device and then display the result.