[NOTE: The Information given below is for Educational Purpose only, and not for malicious purpose. If you wish to carry out any type of malicious activity using this information, you are on your own. We, at HaCoder, will not be responsible for it.]
Hello everybody, and welcome to Hacoder. This is, your friend, Webster, and today I am going to tell you how you can conduct a Simple Man In The Middle Attack (MITM).
Many of you have probably heard of a Man-in-the-Middle attack and wondered how difficult an attack like that would be. For those of you who’ve never heard of one, it’s simply where we, the hacker, place ourselves between the victim and the server and send and receive all the communication between the two.
It should be totally transparent to both the client and the server with neither suspecting they’re connected to anything or anyone but who they expect. This allows us to see and read all of the communication (passwords, confidential information, etc.), as well as alter it, if need be.
In this tutorial, I’ll show you a very simple way to conduct a MITM attack and capture unencrypted traffic.
The Art of Sniffing:-
Before we embark on a MITM attack, we need to address a few concepts. First, sniffing is the act of grabbing all of the traffic that passes you over the wired or wireless communication. There are a number of tools that will enable you to do this. Most famously, Wireshark, but also tcpdump, dsniff, and a handful of others.
Enter Promiscuous Mode:-
In order to see and grab traffic other than your own, you need to first put your NIC or wireless adapter into promiscuous mode (called monitor mode in wireless), meaning that it will pick up ALL traffic, not just that intended for your MAC/IP address. In wireless and wired networks with hubs, this can be accomplished relatively easily. In a switched environment, we need to be a bit more creative.
Switches & Spoofing:-
Switches are designed to reduce network traffic and congestion by isolating traffic and only sending packets to a particular IP address or MAC address that’s the destination, unlike hubs that send all traffic to all NICs. This means that my NIC only sees traffic intended for it, if the switch is doing its job. This makes it harder, but not impossible to sniff and thereby conduct a MiTM attack.
To defeat the switches task of isolating network traffic, a number of strategies have been attempted. On older switches, you could flood them with ARPs and the switch would flood and fail open. These means that it would begin to act like a hub, sending all the traffic to all the NICs, enabling the hacker to sniff other people’s traffic.
This strategy no longer works on modern switches and even on the older ones, a vigilant network admin is going to notice the change in network traffic and volume.
In order for switches to “know” where to send traffic, they maintain a CAM table that essentially maps IP addresses to MAC addresses. This table says that when traffic is intended for IP address 192.168.1.101, for instance, send that traffic to MAC address 11:22:33:44:EE:FF (example MAC address).
If we can change the entries in that table, we can successfully get someone else’s traffic. This is called ARP spoofing, because the entries in the CAM table come from ARPs that are sent out by the switch to gather this information from the NIC.
ARP Spoofing for a MITM Attack:-
What we will be doing here, is using ARP spoofing to place ourselves between two machines making the client believe we are the server and the server believe we are the client. With this, we can then send all the traffic through our computer and sniff every packet that goes in either direction.
Hope all that makes sense! Let’s get started with our MITM attack by opening up BackTrack!
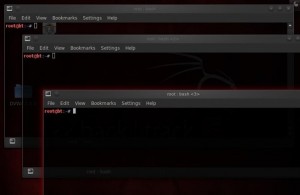
Step 1: Open Three Terminals:-
To conduct this MITM attack, we’re going to need three terminals, so go ahead and open those now. Our goal here is to get a client on our network to believe we are the server and the server to believe we are the client.
arpspoof can do this for us by replacing the MAC address of the client and the server with our MAC address in the ARP table.
Step 2: Arpspoof Client to Server:-
Let’s start with the client. We want to replace the MAC address of the server with our MAC address.
- arpspoof 192.168.1.101 192.168.1.105
Where:
- 192.168.1.101 is the IP of the client
- 192.168.1.105 is the IP of the server
In this step, we’re telling the client that we are the server.
Step 3: Arpspoof Server to Client:-
Now we want to replace the MAC address of the client with our address, so we simply reverse the order of the IP addresses in the previous command.
- arpspoof 192.168.1.105 192.168.1.101
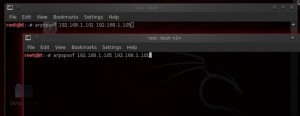
Here, we are telling the server that we are the client.
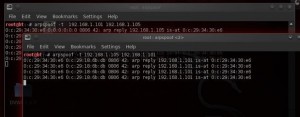
Now execute both of these commands. When we do this, the client will think we are the server and the server will think we are the client!
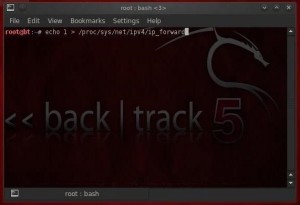
Step 4: Pass Packets with Ipforward:-
Now that we are impersonating both the client and server, we need to be able to pass or forward the packets to the other machine. In other words, we want the packets coming from the server to be forwarded to the client and those coming from the client forwarded to the server.
We do this in Linux by using the ip_forward. Linux has a built-in functionality to forward packets it receives. By default, it’s turned off, but we can turn it on by changing its value to 1(ON).
We simply echo a 1 and direct (>) it to /proc/sys/net/ipv4/ip_forward, thereby turning on ipforwarding.
- echo 1 > /proc/sys/net/ipv4/ip_forward
Now our system, in the middle, is forwarding the traffic it receives to both ends of this connection, client and server.
Step 5: Sniff the Traffic with Dsniff:-
Now that we have all the traffic coming from the client to the server and the server to the client going through our computer, we can sniff and see all the traffic!
To do this, we could use a number of different sniffing tools, including Wireshark or tcpdump, but in this case we’ll use Dug Song’s dsniff. Song designed dsniff to sniff out authentication information that appears on the wire in clear text (non-encrypted). So, protocols such as ftp, telnet, HTTP, SNMP, POP, LDAP, etc. can be sniffed off the wire.
To activate dsniff, we simply type:
- dsniff
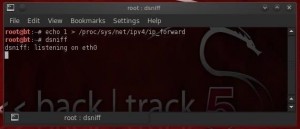
As we can see, dsniff responds that it is listening on eth0.
Step 6: Grab the FTP Credentials:-
Now, let’s wait until the client logs into the ftp server. When he does so, dsniff will grab his credentials and display them to us.
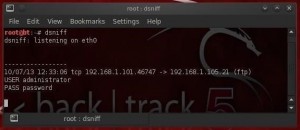
As you see in the screenshot above, dsniff has grabbed the ftp credentials of the administrator with the password of “password”! How easy was that!
It’s important to note that users and administrators often use that same username and password on all services and systems. Now that we have the admin’s ftp password, the next step is to try to log in with it.
That’s it for now. Be sure to check other cool stuff at Hacoder.
Any questions, comments or suggestions are welcomed.
Until next time, Its Webster, signing off.